Payroll Dashboard Configuration (FG381)
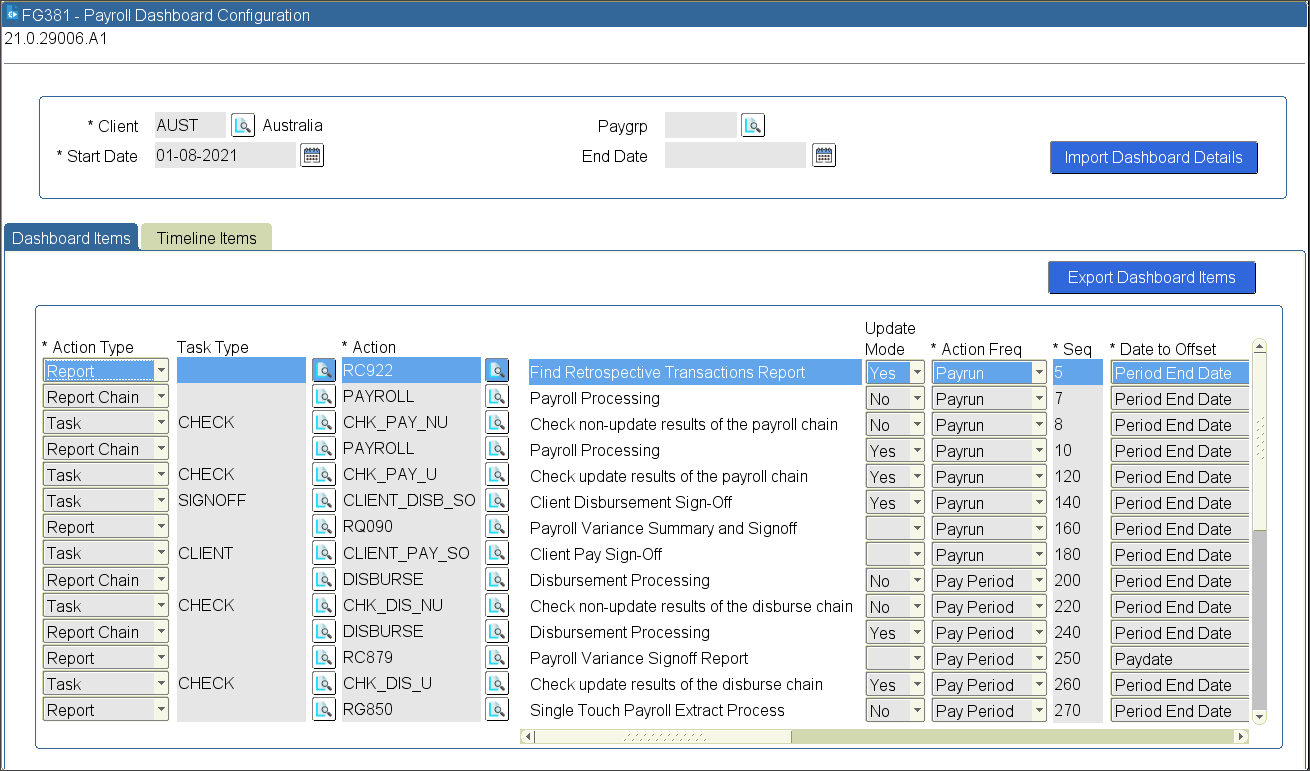
The PUI form ‘FG381 - Payroll Dashboard Configuration’ on menu ‘0675 - Payroll Dashboard Maintenance’ is used to define the dashboard action list at client (country) and/or paygroup level. Start/end date can be used to end date a list at a specific date and start a new one (e.g. if requirements change for legislative reporting etc. on a set date).
The following details can be configured for the dashboard:
Note: If no dashboard is defined for the client country for the paygroup then no dashboards will be generated.
There are two tabs on this form:
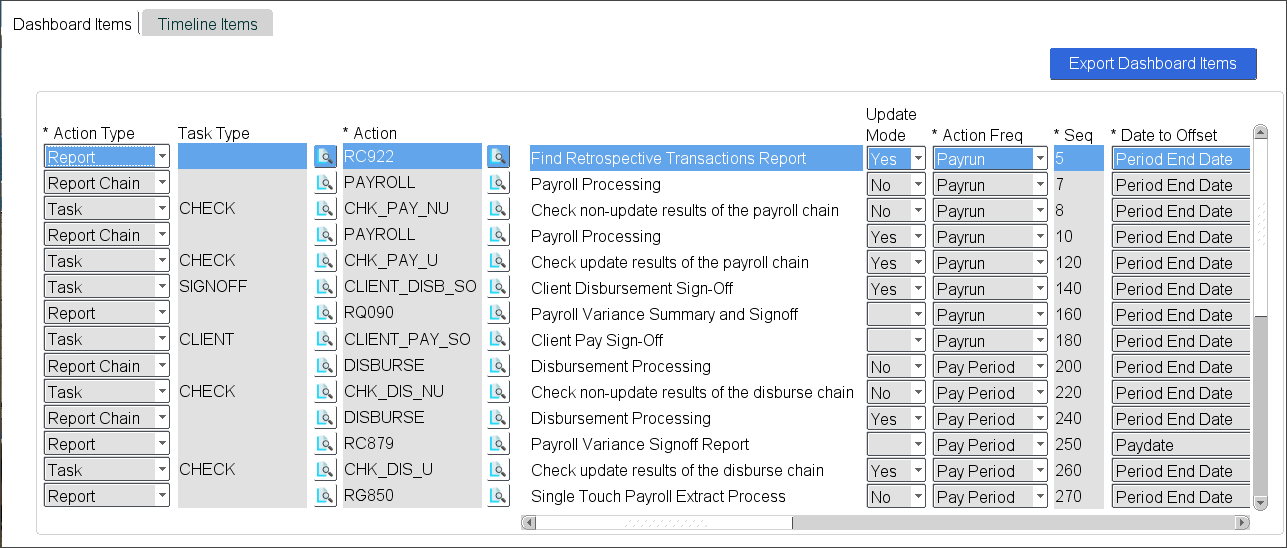
Dashboard Items
The dashboard items tab is used to configure the action list which will be automatically generated for each pay group/pay period whenever a payrun is defined via ‘FC749 - Payrun Definition’ in PUI.
Section 1
Section 2
Section 3
|
Field Description |
|
|
A dashboard action list can include three types of actions: Reports - This is any report within Ascender Pay that can be run for a pay group/pay period. These reports need to be configured in ‘FG382 - Payroll Dashboard Parameter Setup’ in order to be updated in the dashboard action list. Report Chains - Any report chains that are related to the payroll process - for example payroll chains, disbursement chains, end of period processing chains etc. Tasks - Manual action that can be monitored and updated directly via the dashboard action list. Tasks should be defined via the code kind PAYROLL_TASKS. |
|
|
Where action type is Task, additional sub-categories can be configured to assist in identifying the purpose of the task. Tasks Types can be defined in the code kind TASK_TYPE. By default, there are no types configured in this code kind. If there are no task types used in the action list, this column will not display in the dashboard. This is an optional field. |
|
|
The action is the report, report chain or task to be performed. A look up is available on this field as follows: For action type = Report, the lookup will display all available reports For action type = Report Chain, the lookup will display all available report chains as defined in code kind REP_CHAIN For action type = Task, the lookup will display all tasks defined in the code kind PAYROLL_TASKS. |
|
|
The update mode flag indicates if this action should be performed in non-update or update mode. Duplicate records can be created in the action list with one in non-update mode and another in update mode if the action is required to be executed in each mode. For example, the payroll chain will generally be run in non-update mode first, the values are checked and verified and then it will be run in update mode. This field can be left blank if the update mode does not apply to the action. |
|
|
This is a drop-down list with available options of “Payrun” and “Pay Period”. The action frequency indicates if this action should be added to the dashboard action list once per pay period or once for each payrun defined in the pay period. |
|
|
The numeric order in which the actions should be executed. This number does not need to be continuous in sequence. |
|
|
The action due date can be calculated based on an offset from either the Period End Date or the Paydate. This field indicates which date should be used to calculate back from to determine the action due date. |
|
|
The number of days that should be subtracted from the offset date to determine the action due date. For example, if the date to offset is set to Paydate and the paydate is 15-Feb, if the offset days is set to 2 then the action due date will be set to 13-Feb. |
|
|
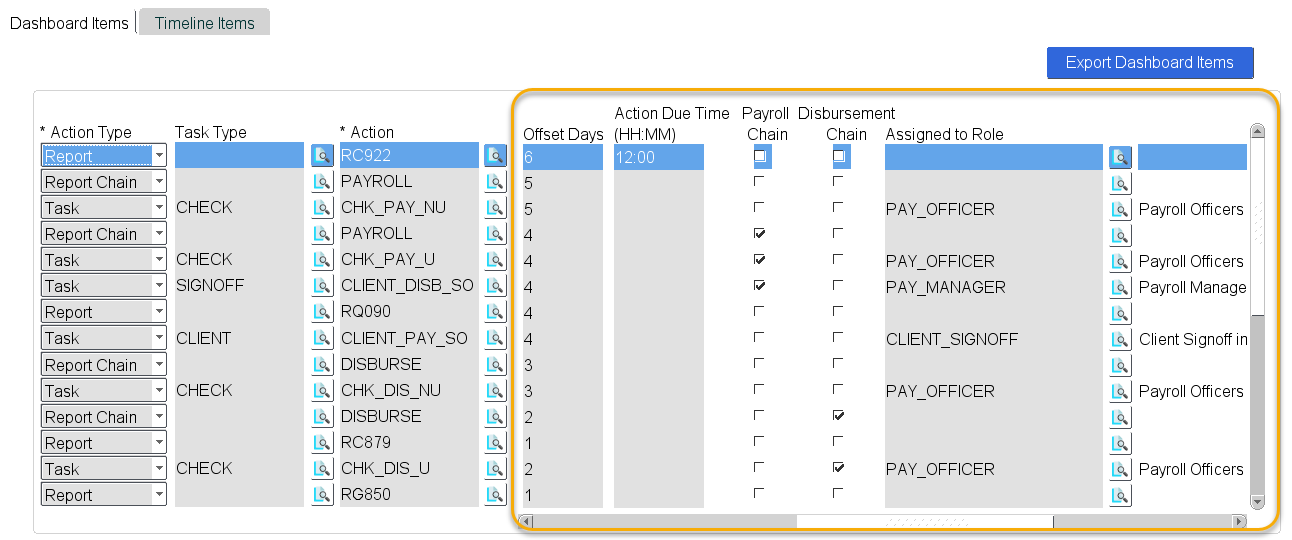
Action Due Time (HH:MM) |
The time on the due date that the action needs to be completed by. This should be entered in format HH:MM e.g. 10:00. This is an optional field. |
|
The payroll chain checkbox indicates any actions which should be repeated on the event the pay is run in update mode and then reversed. For example, tick the box for the PAYROLL chain in update mode and any validation tasks for the payroll chain to indicate it needs to be completed again in update mode if the payroll chain is reversed. All actions with the box checked will be repeated when the pay is reversed. |
|
|
The disbursement chain checkbox indicates any actions which should be repeated on the event the disbursement is run in update mode and then reversed. All actions with the box checked will be repeated when the disbursement is reversed. |
|
|
For tasks, assign a role to a task to specify which users will have access to update the status in the dashboard. Any role that is defined in ‘FE600 - Express User/Group Security’ can be assigned to a task. This can be either existing roles or new roles can be created specifically for this purpose to grant access to different tasks for different users. For example: A different role could be created for Payroll Officers vs. Payroll Managers so different tasks can be completed by these groups of users. This is an optional field. |
|
|
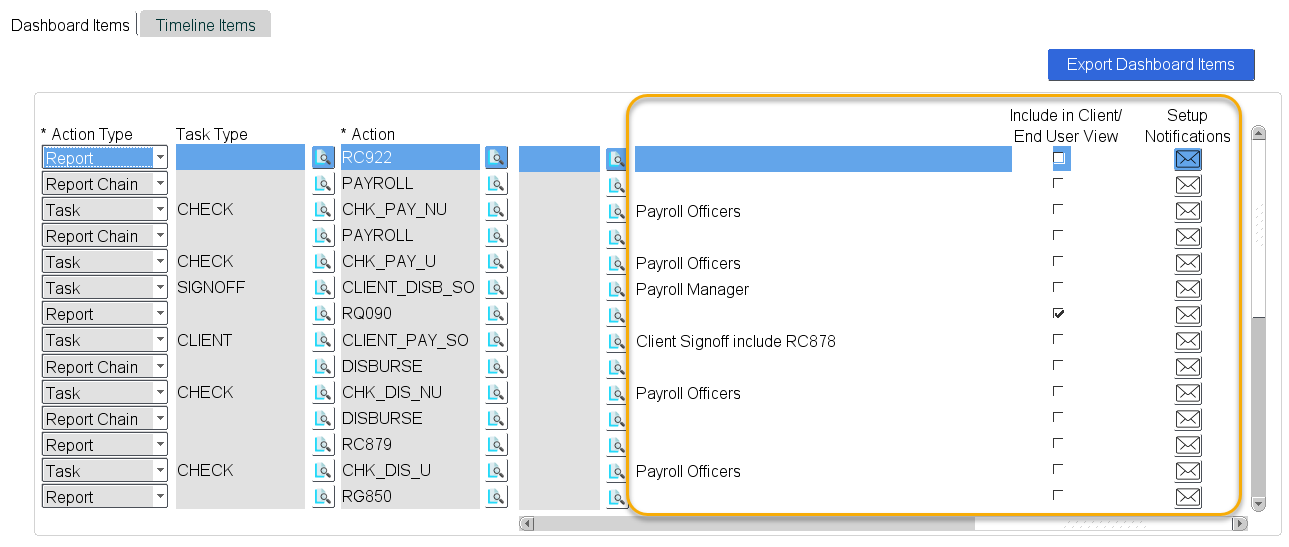
Include in Client/End User View |
If a different view of the action list is required for client or end user to view to hide the full action list from these users, use this checkbox to indicate the actions that the client/end users should be allowed to see. This will work in conjunction with the CLIENT VIEW privilege which can be granted to these users in ‘FE600 - Express Users/Group Security’ to provide them with a restricted view of the action list. |
|
Setup Notifications |
Set up notification emails to be sent automatically when the action status is changed. If a number displays next to the button, then this indicates that some notifications are already setup for the action. For more details, please refer to the Setup Notifications section below. |
Please refer to Appendix C - Adding Frequently Used Reports to the Dashboard for instructions on how to configure commonly used reports and report chains to FG381.
Timeline Items
Within the Payroll Management Dashboard, a timeline graphic is displayed on both the payroll and pay group dashboards. The dates that are included on this timeline can be configured for each client country and/or pay group.
Below is an example of the timeline from the payroll dashboard:
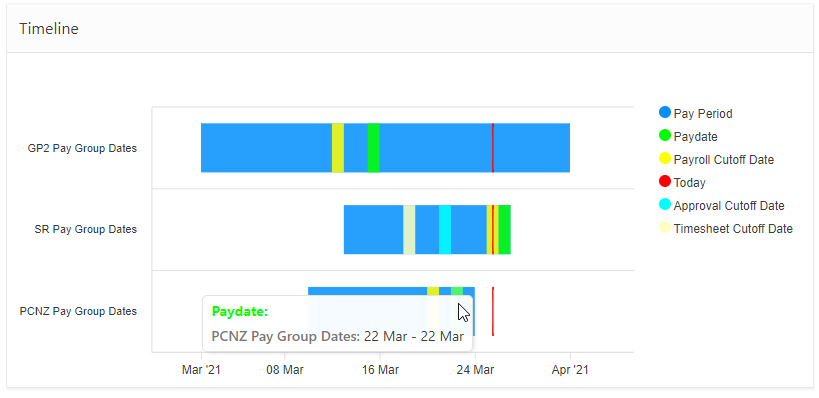
By default, the pay period dates will always display and today will always display for current pay period. Additional dates can also be displayed including dates from the payrun definition and also custom defined dates.
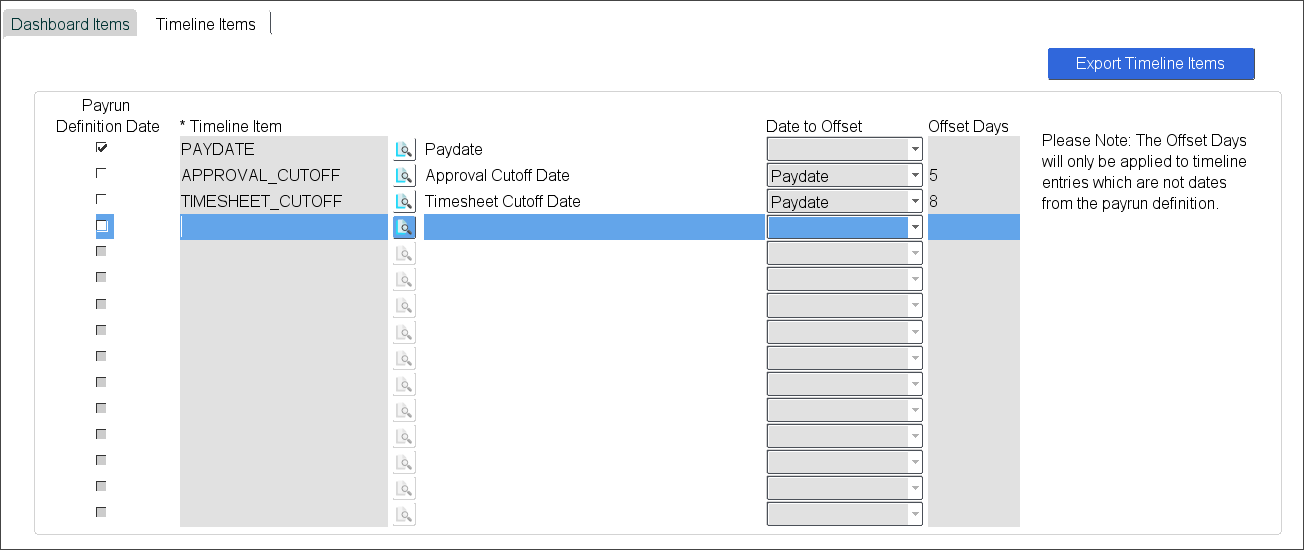
Note: The Offset details should only be populated for non payrun definition dates. If they are populated for the payrun definition dates, they will be ignored.
Use the ‘Setup Notifications’ button on the Dashboard Items tab to setup automated notifications for actions when the status is changed. This button will open a new screen as shown below:
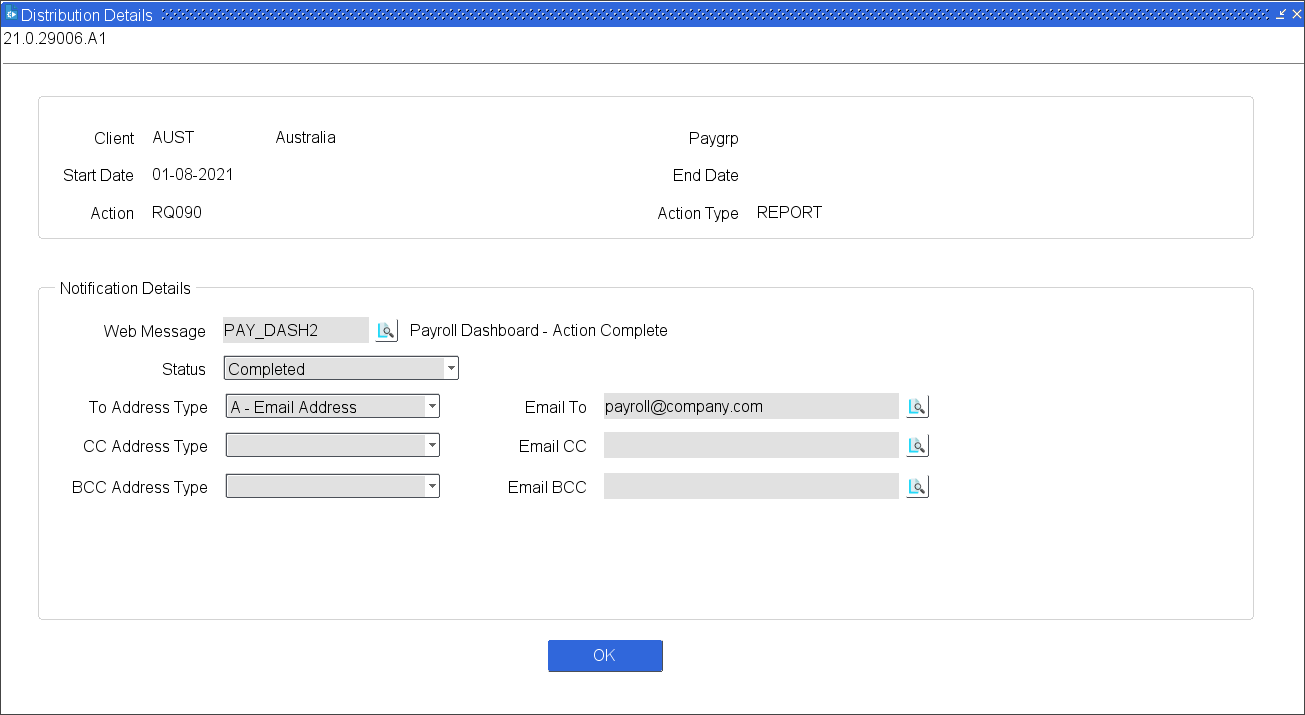
Multiple notifications can be created to be triggered for different statuses or to send different web messages.
Details of the fields are as follows:
|
Field Description |
|
|
Web Message |
The pre-defined web message. A lookup is available to select the web message which must first be defined in ‘FD065 - Email Message Maintenance’. This field is mandatory |
|
Status |
Select the status that the notification should be sent for. This is a drop-down list. To send the same notification for multiple statuses, create multiple records within this screen. This field is mandatory |
|
Email Address Type To |
Select an email address type from the drop-down list for the Email To field. The available options are: A - Email Address E - Employee Number M - Mail Group P - Position Number This field is mandatory |
|
Email To |
The email address, employee number, mail group or position number to send the notification to for the ‘To’ email address. For employee number and position number, the email address will be taken from the WSS mailing group for the specified employee# (or employee# occupying the selected position). |
|
Email Address Type CC |
Select an email address type from the drop-down list for the Email CC field. The available options are: A - Email Address E - Employee Number M - Mail Group P - Position Number |
|
Email CC |
The email address, employee number, mail group or position number to send the notification to for the ‘CC’ email address. For employee number and position number, the email address will be taken from the WSS mailing group for the specified employee# (or employee# occupying the selected position). |
|
Email Address Type BCC |
Select an email address type from the drop-down list for the Email BCC field. The available options are: A - Email Address E - Employee Number M - Mail Group P - Position Number |
|
Email BCC |
The email address, employee number, mail group or position number to send the notification to for the ‘BCC’ email address. For employee number and position number, the email address will be taken from the WSS mailing group for the specified employee# (or employee# occupying the selected position). |
|
Value |
Description |
|
ACTION |
Action code for the action as defined in ‘FG381 - Payroll Dashboard Configuration’. |
|
ACTION_DESC |
Description for the action code |
|
STATUS |
Current status of the action |
|
PAYRUN |
Payrun for the action being updated (where applicable) |
|
UNIQUE_ID |
The unique ID from the report monitor for reports and report chains |
|
START_DATE |
The start date for the action |
|
END_DATE |
The end date for the action |
|
USERNAME |
The username of the user who last updated the status of the action |
|
UPDATE_FLAG |
Update flag to indicate if the report is run in update or non-update mode (where applicable) |
|
COMMENTS |
Comments for the action as entered in the dashboard screen in Express |
|
ACTION_DUE_DATE |
Action due date |
|
ACTION_DUE_TIME |
Action due time |
|
PAYGRP |
Paygroup for the action’s dashboard |
|
PERIOD_END_DATE |
Period end date for the action’s dashboard |
|
ACTION_TYPE |
Action type - e.g. Task, Report or Report Chain. |
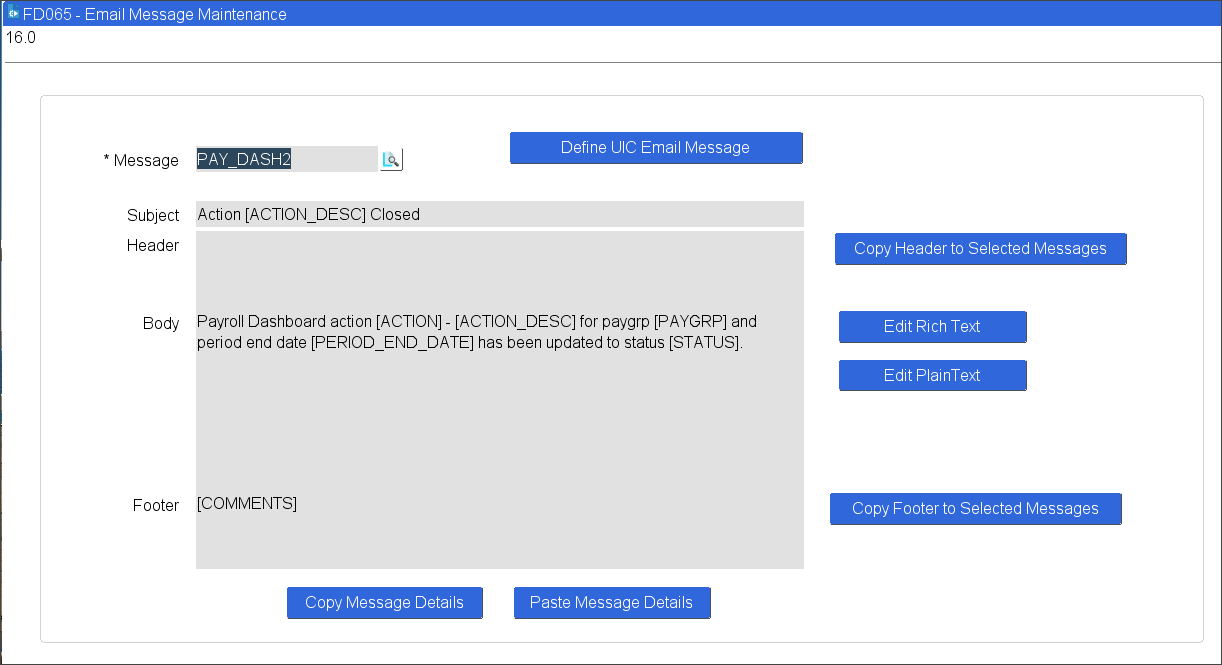
Replacement values can be included in the notification fields enclosed within square brackets. These will be automatically replaced with the value relating to the item when the notification is generated. Available values include the following:
Deleting Dashboard Configuration
To delete a dashboard configuration, use the Delete Record button or shortcut-key from the top block on the form (i.e. the Client, Paygrp, Start Date or End Date fields). This will display the following message:
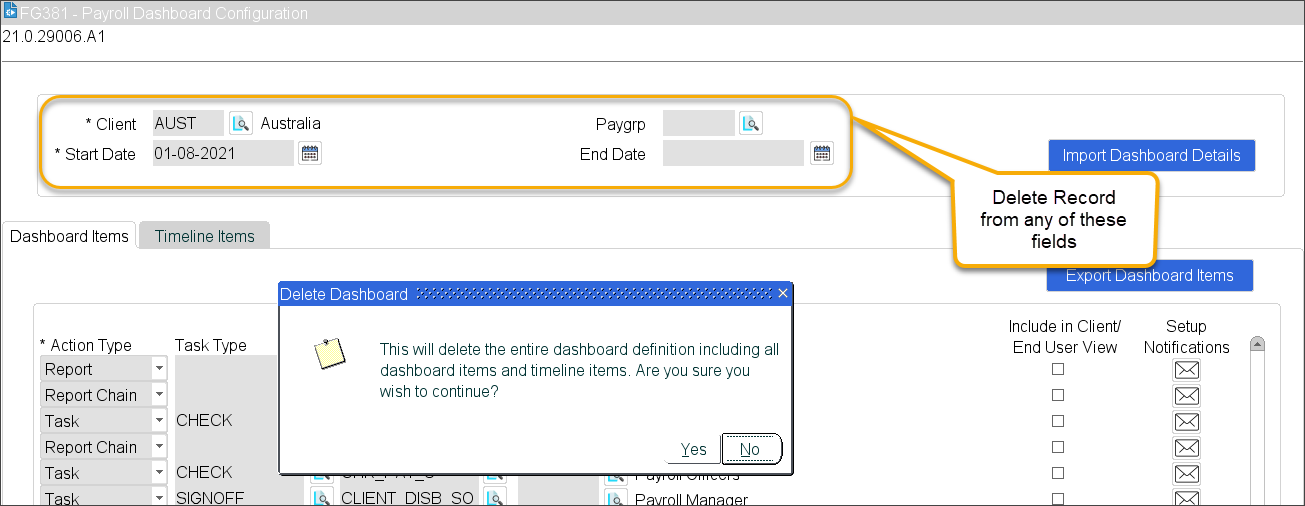
Select ‘Yes’ and all Dashboard and Timeline items will be deleted.
Note: It is not recommended to delete dashboard definitions once they have been used to generate dashboards for payruns. This could result in the dashboard action list displaying incorrectly on your dashboard and will prevent any new dashboards from being created for your client country/paygrp. To create new dashboard definitions, it is instead recommended to end date your existing definition and create a new one.
Export Dashboard and Timeline Items
Once a dashboard configuration has been defined, it can be exported to a CSV file. This file can then be used to import the dashboard configuration into a different Ascender Pay environment, or it can be modified to suit different client country, paygroup and/or dates and then imported back into the same environment.
To export the dashboard configuration, use the ‘Export Dashboard Items’ button on the ‘Dashboard Items’ tab and the ‘Export Timeline Items’ button on the ‘Timeline Items’ tab. These buttons will display the following screen:
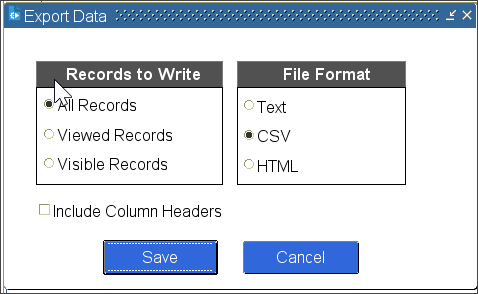
Select the file format CSV to export the file in a format that can later be imported for a different dashboard configuration or Ascender Pay environment.
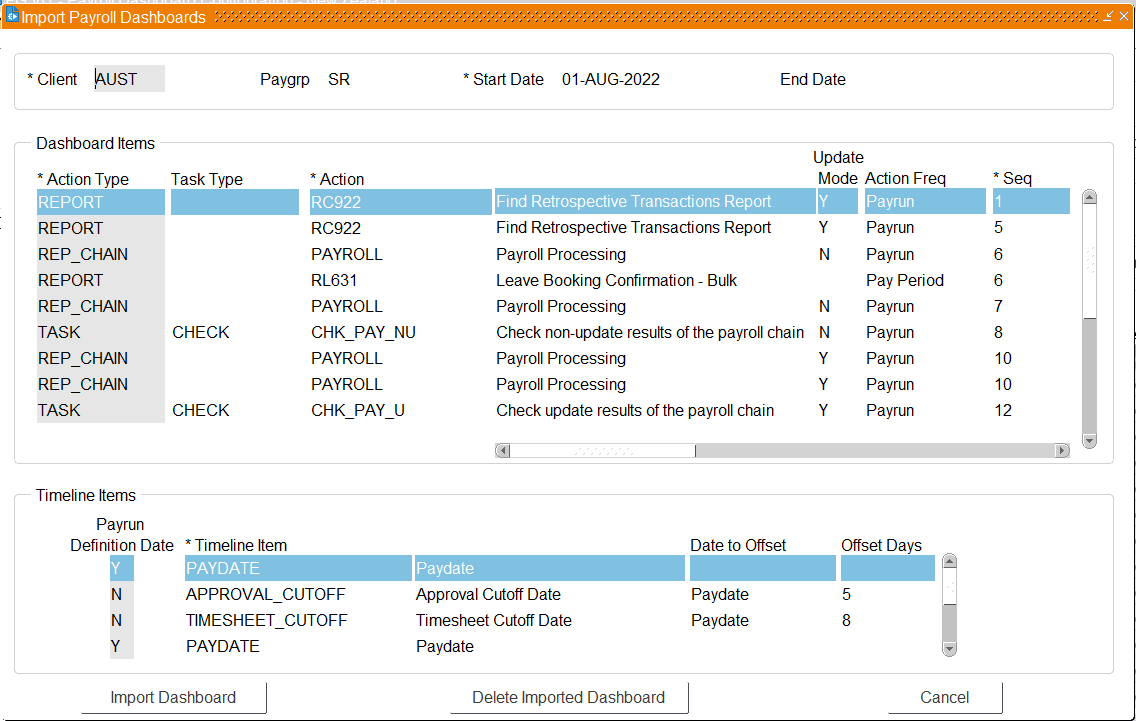
Dashboard details can be importing into the Dashboard Configuration form once the CSV files have been imported. For details on importing the CSV files, please refer to the Importing Dashboard and Timeline Configuration section of this user guide.
To view the dashboard details that were loaded from the CSV files, select the ‘Import Dashboard Details’ button:

The imported dashboard details will display. Arrow up and down from the Client field or use next/previous record buttons to see all the dashboards waiting to be imported:
The ‘Import Dashboard’ button will validate all of the dashboard and timeline records to be imported. If any validation errors occur, the error details will be displayed.
For example:
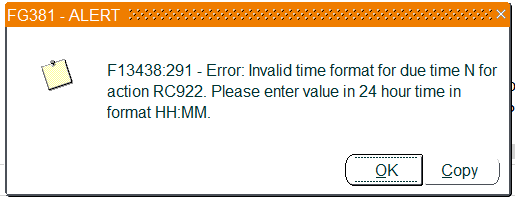
If this occurs, the CSV file should be corrected and reloaded before the data can be loaded.
Once the dashboard has successfully loaded, it will no longer display in the Import screen.
Use the ‘Delete Imported Dashboard’ button to remove an imported dashboard without loading it into the configuration form.